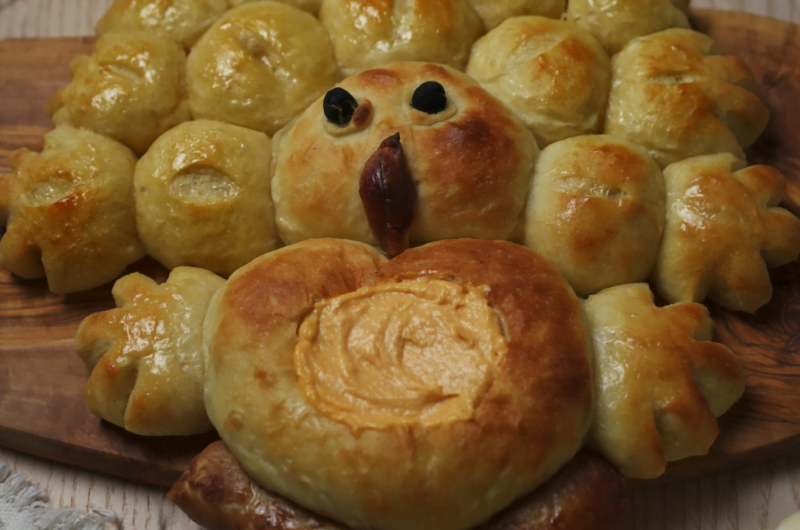
Searching for an extraordinary holiday centerpiece? Your quest ends here! In this blog post, we’ll walk you through the journey of crafting an adorable, pull-apart turkey bread featuring an integrated dip bowl. This charming, turkey-shaped loaf, complete with a bread dip bowl, is a sensational addition to your holiday spread, whether you’re hosting a vegan feast or not. Prepare to dazzle your guests and make this upcoming Thanksgiving, Christmas, and Easter (or any holiday you celebrate) an extra memorable one.
Shopping list:
Before you embark on this culinary adventure to make your very own pull-apart turkey bread, make sure you have all the necessary ingredients. Here’s your shopping list:
- 800 grams of bread flour (approximately 6 cups)
- 200 grams of mashed potatoes (approximately 1 cup)
- 1 tbsp of salt
- 1/4 cup of sugar
- 10.5 grams of instant yeast (approximately 1.5 packages)
- 6 tbsp of a neutral-tasting oil
- 2 tbsp of plant butter or additional oil
- About two cups of plant milk
- 2 tbsp of cocoa powder
- 1 tsp of charcoal powder (optional)
- 1 tbsp of maple or agave syrup
- 2 cups of your favorite bread dip

How to Make
Mix Ingredients:
Start by getting all your ingredients ready. In a big mixing bowl, toss in the flour, yeast, salt, and sugar. Then, add in the mashed potatoes, non-dairy milk, and water. Mix everything together first with a spoon and then roll up your sleeves and knead it with your hands. You might need to adjust with more milk or flour depending on how things look. Keep kneading until the dough feels stretchy and elastic, which should take around 8-15 minutes.
Rising Time:
Next up, take a breather. Lightly grease a large bowl with oil and pop your dough inside. Cover it up with a lid or plastic wrap and let it chill in an environment that’s in the mid to high 70s F (mid-20s C) until it’s doubled in size. Tips on where to put the dough to rise here.
Shaping the Pull-Apart Turkey Bread
Once your dough has puffed up nicely, gently deflate it. Now, it’s time to get artistic.
Beak/snood, eyes, and feet:
Grab some of that dough and shape it into a beak/snood, eyes, and feet. You can get creative with how these look. For the beak/snood and feet, a sprinkle of cocoa powder gives them the perfect look. The eyes need some charcoal powder or cocoa powder to stand out too.
Head and Body:
Take two substantial portions of dough to create the head and body. Begin by shaping them into round balls. Gently fold the dough edges underneath to create surface tension. Once the tension is sufficient and you can’t fold the edges further, place the dough seam-side down on a floured surface. Cup the dough and turn it in your hands a few times to enhance surface tension. You can also watch the provided video for a short visual demonstration of this process.
Feathers/Wings:
Let’s not forget the feathers and wings. Cut your remaining dough into 16 pieces, roughly the same size, and shape into dinner roll-sized dough balls using the same process as above.
Assembly:
Time to assemble your masterpiece. Grab a baking tray and line it with parchment paper. The body and head dough balls should be close buddies on that tray. Surround the head with 14 of the small dough balls to act as the tail feathers, and tuck the remaining two balls into the body to form wings. Tuck the feet under the body then place the beak/snood in the center of its face. Poke two holes with your fingers to form eye sockets and assemble your eyeballs.
Preheat Oven and Rest your Dough:
Let your dough rest for 10 minutes. Meanwhile, begin pre-heating the oven at 425F (218C).
Wash & Score:
Whisk up a little wash with plant milk and maple or agave syrup. Brush this all over your turkey, but avoid the areas covered in cocoa and charcoal powder. Grab a sharp tool and score the center of each tail feather dough ball.
Baking the Bread Turkey:
Now for the oven part. Pop your dough masterpiece in there and bake it until the top turns a beautiful golden brown and the bottom sounds hollow when you tap it. That’s usually about 30 minutes. Just keep an eye on it, especially after the 15-minute mark, and if any part starts browning too quickly, cover it with some aluminum foil.
Serving:
Once it’s done, give your pull-apart turkey bread about 45 minutes to cool down. When it’s ready, grab a serrated knife and cut off the top third to half of your bread turkey. That’s where you’ll stash your favorite dip. It’s time to serve it up and enjoy your fantastic creation!

Tips:
- Use a large baking tray: Use a baking tray that is a minimum of 15 by 20 inches. Any smaller and your pull-apart turkey bread will be smushed!
- Kneading the Dough: Knead the dough until it’s smooth and elastic. Proper kneading helps develop gluten and gives the bread a good texture.
- Rising Time: Allow the dough to rise until it has doubled in size. The exact time may vary based on room temperature, so be patient.
- Cooling Time: Let the bread cool for the recommended time or else the bread bowl will be gummy inside.
- Dip Ideas: Think about the dip you want to serve with your pull-apart turkey Bread. Consider options like hummus, spinach, or cheese dip. Our cilantro serrano hummus makes a good pairing here.
- Short Video Tutorial: Visual learners be sure to watch this video on how to make the pull-apart bread turkey.
Can I make it gluten-free?
If you’d like to create a gluten-free version of the pull-apart turkey bread, I recommend using your favorite gluten-free bread recipe and starting our recipe at step three. Just make sure to have ample dough!

Conclusion:
This Thanksgiving, Christmas, and Easter (or any holiday you celebrate) you’re the chef with the most style and flair at the table. With your pull-apart turkey bread complete with a bread bowl dip, you’ll create a bread that’s not just delicious but also a work of art. Happy holidays!
Pull-Apart Turkey Bread
Course: Starter, SidesDifficulty: Hard18
servings1
hour2
hours30
minutesMake this upcoming holiday extra memorable with a pull-apart turkey bread filled with your favorite dip!
Ingredients
- Dough:
800 grams of bread flour (approximately 6 cups)
200 grams of mashed potatoes (approximately 1 cup)
1 tbsp of salt
1/4 cup of sugar
10.5 grams of instant yeast (approximately 1.5 packages)
6 tbsp of a neutral-tasting oil
1 3/4 cup of plant milk
- Decorating:
2 tbsp of cocoa powder
1 tsp of charcoal powder (optional)
- Wash:
2 tbsp of plant milk
2 tsp of maple or agave syrup
- Serving:
2 tbsp of plant butter or oil
2 cups of your favorite dip
Directions
- Mix Ingredients: Begin by combining the dry ingredients in a large mixing bowl, including flour, yeast, salt, and sugar. Then add the wet ingredients at room temperature– mashed potatoes, non-dairy milk, and oil. Mix initially with a spoon and then knead with your hands until the dough forms a cohesive ball. Depending on factors such as your environmental conditions and the moisture content of your mashed potatoes, you might need to adjust with a bit more milk or flour. Once the dough is well combined, lightly dust your work surface with flour and knead the dough until it becomes elastic, which should take around 8-15 minutes.
- Rising: Lightly grease a large bowl with olive oil and place the kneaded dough inside it. Cover the bowl with a lid or plastic wrap and allow the dough to rise in an environment that’s ideally in the mid to high 70s F (mid-20s C) until it has doubled in size, which can vary in time from 30 minutes to 2 hours.
- Shaping the Turkey: Once the dough has risen, turn it out onto a lightly floured surface and gently deflate it.
- Creating the Beak/Snood, Eyes, and Feet: Pinch off a portion of dough approximately the size of two golf balls. Cut a thin slice about 2 inches long and 1/2 inch wide with scissors. Shape this piece into a beak/snood using your fingers as needed. For the eyes, snip off four smaller pieces of dough, roughly the size of marbles. Roll these smaller pieces between your hands to create small dough balls. Flatten two of these small balls into thin disks. To form the feet, shape the remaining dough into a ball and then cut it in half. Make two cuts into the flat side of each semi-circle to create toes, and gently pull and pinch the toes into pointed shapes, using water as needed to help shape them. Take the feet and beak/snood and sprinkle cocoa powder over them, then gently rub it in. Any excess cocoa powder should be blown off. Similarly, roll the two smaller dough balls, which will serve as pupils, in charcoal powder or cocoa powder if you don’t have any, and then blow off any excess.
- Head and Body: Using a bench scraper or a knife, separate approximately 2/5ths of the dough and set aside the larger piece. Take the remaining dough and separate one-third of it, shaping each piece into a ball. These two dough balls will represent the head and body of your bread turkey. For tips on how to shape dough into a round ball read the notes below.
- Feathers/Wings: Take the remaining dough and cut it into 16 pieces, which can be achieved by halving the dough four times. Shape each piece of dough into a ball.
- Assembly: Line a large baking tray with high-heat parchment paper. Arrange the dough balls for the body and head so that they are touching. For the tail feathers, position five of the smaller dough balls around the head, close enough to touch both the head and each other. Position an additional nine dough balls around the five touching. For the wings, take the remaining two dough balls and tuck them under the body. Tuck the feet underneath the body as well, being careful not to transfer cocoa powder to undesired areas. Place the beak/snood on the center of the head dough ball and gently press it in to adhere. To create eye sockets, poke two deep holes next to the beak/snood, and press the two small dough disks inside the sockets. Carefully set the pupils inside the disks, taking care not to transfer any charcoal powder to undesired areas.
- Feather Details: Similar to what was done for the feet, make cuts into the outside perimeter of the tail feather dough balls and wing dough balls. Form the cut pieces into points by pinching and gently pulling the dough strips, using water as needed to assist in forming the pointed feathers.
- Rest Dough and Preheat Oven: Let the dough rest for 10 minutes. Meanwhile, begin preheating your oven to 425F (218C).
- Wash and Score: Prepare a wash by mixing 2 tablespoons of plant milk with 2 teaspoons of maple or agave syrup. Brush the dough with this wash, avoiding the beak/snood, eyes, and feet. Use a lame or a sharp object to score the center of each tail feather dough ball, with the cuts radiating outward from the head to resemble the quill of a feather.
- Baking the Bread Turkey: Place the dough in the oven and bake until the tops are lightly golden, and the bottom of the bread turkey’s belly sounds hollow when tapped. This typically takes about 30 minutes. Starting at the 15-minute mark, check on your bread turkey. If one area begins to brown more quickly than the rest, loosely cover that section with aluminum foil.
- Serving: Allow the bread to cool for approximately 45 minutes. To serve, brush the top of the bread with oil or butter. Then, use a sharp serrated knife to make a horizontal cut around the upper one-third to one-half of the turkey’s belly. Then fill it with your favorite dip and enjoy your delicious creation!
Notes
- Your baking tray must be a minimum of 15 inches by 20 inches for the turkey to fit.
- How to shape dough into a round ball: Gently fold the dough edges underneath to create surface tension. Once the tension is sufficient and you can’t fold the edges further, place the dough seam-side down on a floured surface. Cup the dough and turn it in your hands a few times to enhance surface tension.
- If you would like to make this turkey gluten-free make a large batch of your favorite gluten-free bread recipe and follow the directions here starting with step 3.
- Allowing the bread ample time to cool will prevent the bread dip bowl from being gummy.
- Read this for tips on where to let your dough rise if your room temperature is not ideal.
- Disclaimer: No birds were harmed in the making of this turkey.


